Easy DIY Weatherproofing: Preparing Your Home for Changing Seasons
As the seasons change, we can prepare our homes to stay warm and safe. We’ll start by inspecting the roof and foundation for any potential issues, ensuring everything’s intact. Next, let’s seal those drafty windows and doors with weatherstripping or caulk to keep the chill out. We shouldn’t forget to add extra insulation in the attic, which really helps maintain our home’s warmth. For exposed pipes, wrapping them in foam insulation will prevent freezing and bursting, a common hazard in colder months. These steps not only enhance comfort but also cut down on our energy bills. It’s amazing what we can achieve with just a few simple updates.
Assessing Home Vulnerabilities
Before we tackle the hands-on work of weatherproofing, it’s vital we first identify where our homes are most at risk. Understanding these vulnerabilities can guide us in effectively safeguarding our living spaces. Let’s focus on key areas beyond windows and doors.
Firstly, inspect your roof. Damaged or missing shingles are a clear invitation for water damage. During a calm day, use binoculars to check for any signs of wear or damage from the ground, or consider hiring a professional for a more thorough inspection.
Next, we must consider the basement and foundation. Cracks or gaps in these areas can allow water to enter, risking not only property damage but also our health by encouraging mold growth. Regularly examine these spaces for any signs of moisture or discoloration.
Don’t overlook the gutters and downspouts. They play an important role in directing rainwater away from your home. Verify they’re not clogged with leaves or debris and that water flows freely and away from your foundation.
Sealing Windows and Doors
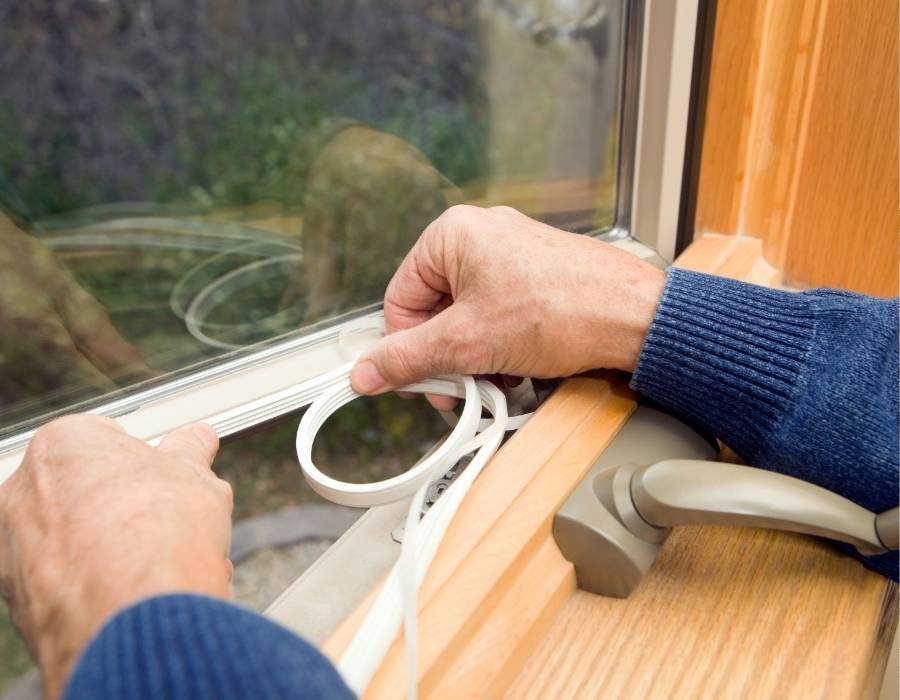
After identifying the broader vulnerabilities in your home, let’s focus on sealing windows and doors, a critical step in effective weatherproofing. Small gaps and leaks can lead to significant heat loss and unnecessary energy bills. We’ll tackle this with a few straightforward measures.
Firstly, inspect all window and door frames for drafts. Feel for air movement or use a candle to detect slight breezes; if the flame flickers, you’ve found a leak. We can address these gaps with weatherstripping. It’s available in various materials like foam, rubber, and silicone. Choose based on durability and the gap size you’re dealing with.
Next, consider caulking. It’s perfect for non-moving parts of your windows and doors. Apply a bead of caulk around the frame where it meets the wall, ensuring a continuous, sealed line. This prevents both air and moisture from entering, enhancing your home’s safety and comfort.
Lastly, don’t overlook the door sweeps. These are critical for sealing the gap between the bottom of your door and the threshold. They’re simple to install and effective at blocking drafts.
Insulating Attics and Walls
Moving to the upper regions of your home, insulating attics and walls is essential for maintaining a comfortable living environment and reducing energy costs. Let’s explore how we can tackle this project together, ensuring our homes are not only cozy but also energy-efficient.
First, assess your current insulation. Many homes have insufficient attic insulation, which can lead to significant heat loss. Ideally, you’ll want to achieve an R-value—a measure of insulation’s ability to resist heat flow—that suits your region’s climate. Check the U.S. Department of Energy’s guidelines for recommended levels.
Adding insulation to your attic is a straightforward process. You can choose between batts, rolls, or loose-fill insulation. Batts and rolls are easier to handle, but loose-fill can provide better coverage in irregular spaces. Don’t forget to wear protective gear, such as gloves, a mask, and goggles, to keep you safe from irritants.
For walls, adding insulation might require professional assistance, especially if you need to open up wall spaces. However, for exposed walls in areas like basements or garages, rigid foam boards or spray foam can be effective and are manageable as DIY projects.
Weatherproofing External Pipes
While focusing on the warmth inside, it’s just as important to protect the home’s exterior from cold weather damage. External pipes are particularly vulnerable as temperatures drop, risking costly repairs if they freeze and burst. To avoid this, we’ll need to take some proactive steps to safeguard these vital components.
Firstly, let’s identify all exposed pipes around the exterior of our home. These might be along the sides of the house or leading into the garden. Once located, we can move on to insulating them. We recommend using foam pipe insulation—this material is inexpensive, easy to install, and readily available at most hardware stores. Simply cut the insulation to the length of the pipe and secure it in place. For added protection, cover any joints and bends extra carefully, as these are often the first to freeze.
Additionally, don’t forget to check for leaks or cracks in the pipes. Even a small fissure can let in cold air and increase the risk of freezing. If we find any, we should seal them immediately with weather-resistant tape or caulking.
Taking these precautions now will help guarantee our home remains safe and dry, regardless of the weather outside.
Upgrading to Energy-Efficient Appliances

Turning our attention indoors, upgrading to energy-efficient appliances is a smart move for any homeowner seeking to reduce energy costs and environmental impact. By choosing appliances that use less energy, we’re not only cutting our utility bills but also contributing to a healthier planet.
Energy-efficient appliances, such as refrigerators, washers, and HVAC systems, operate more effectively and use considerably less electricity and water. This means they’re not only safer for our environment but also for our homes by reducing the risk of overloads and electrical faults. When we opt for these modern technologies, we’re investing in safety and sustainability.
Moreover, many governments offer rebates and incentives for purchasing energy-efficient appliances, making them an economical choice in the long run. We should take advantage of these programs to upgrade our appliances without straining our budget.
To start, let’s assess our most energy-consuming appliances and prioritize their replacement. By focusing on the units that work the hardest, like heating and cooling systems, we’ll maximize our energy savings. Remember, every small step leads to greater energy efficiency and safety in our home. So, let’s make the switch to energy-efficient appliances and enjoy a safer, greener home.